 February 24th, 2012 by
  Craig Schwarzwald
 Creating a Facebook App with Java – Part 1 – Setup and Tool Installation
 We’ve all heard of “mobile apps” that are sweeping the internet – stories of developers creating hit apps in their parents basements, or while having coffees at Starbucks. They strike it rich, quit their jobs, and retire wealthy before the age of 25; but first, lets set some reasonable expectations. Those stories do happen, and they make the news because they’re fun to hear about, but you might want to consider playing the lottery for some better odds if you really think you’re next. I strongly believe that mobile apps (and/or HTML5 webpage apps) are the future of software development. Beyond that, social media is going to keep playing a greater and greater role in these applications.
This article will take you through setting up a new Facebook app, from beginning to end. It is assumed that you are a developer, and as such are working on some UNIX based platform (all examples in this article will be from Ubuntu 11.10). Those working on Windows (like I may have been just last year) will have to find equivalent commands for certain parts. It is worth noting here that I am not a JBoss employee, nor am I affiliated with them in any way. However I am friends with several of their lead developers, which probably helped my initial gravitation in that direction. You will see me reference JBoss projects many times throughout this tutorial, and while you are always free to use your own alternatives, you may need to deviate from my instructions to do so.
We’ve all heard of “mobile apps” that are sweeping the internet – stories of developers creating hit apps in their parents basements, or while having coffees at Starbucks. They strike it rich, quit their jobs, and retire wealthy before the age of 25; but first, lets set some reasonable expectations. Those stories do happen, and they make the news because they’re fun to hear about, but you might want to consider playing the lottery for some better odds if you really think you’re next. I strongly believe that mobile apps (and/or HTML5 webpage apps) are the future of software development. Beyond that, social media is going to keep playing a greater and greater role in these applications.
This article will take you through setting up a new Facebook app, from beginning to end. It is assumed that you are a developer, and as such are working on some UNIX based platform (all examples in this article will be from Ubuntu 11.10). Those working on Windows (like I may have been just last year) will have to find equivalent commands for certain parts. It is worth noting here that I am not a JBoss employee, nor am I affiliated with them in any way. However I am friends with several of their lead developers, which probably helped my initial gravitation in that direction. You will see me reference JBoss projects many times throughout this tutorial, and while you are always free to use your own alternatives, you may need to deviate from my instructions to do so.
In part two of this series, we cover creating our project code, hosting it, and setting up basic facebook functionality; part three covers turning our application into a game. Lastly, in part four we set up automated integration test cases and a MySQL database.
Overview
You may have heard terms like gamification, social networking, or even peer pressure, which all point to social applications giving developers more power to reach and captivate a wider audience than ever before; these social applications have the capability of growing exponentially faster than on any other medium. So the next logical question, “why use Facebook?” Google+ is up and coming, there’s Twitter, LinkedIn, and the list goes on. “What makes Facebook so special?” The answer is quite simply the fact that… EVERYONE… is on Facebook – that’s where people have the most “friends” and connections. Until this changes (if it ever does), it’s where you want to focus integrating your social connection points on your app. Other social media APIs may also be useful to integrate with, in addition, and if all goes well with these first few tutorial posts, I’ll provide more in the future showing you how to use Twitter as a great way to add to your social media influence, even send direct SMS messages for free to your users (perhaps other APIs/useful things as well… we shall see). For right now, we will focus on what we need to build our first Facebook application.Many steps throughout this tutorial may seem basic for more advanced/professional developers. I provide the full project on GitHub, so you can feel free to look at the complete code at any time – move at your own pace.
In this blog series, we will
- Set up our Development Environment, including installation of Java, Eclipse, and a Jboss AS7 server for local development.
- Sign up for Facebook app development, and setup our first app.
- Use JBoss Forge to quickly create projects in Eclipse as well as install plugins for other frameworks like cloud hosting and REST web services (some of which we will explore in this article).
- Sign up for free app hosting on Red Hat’s OpenShift cloud.
- Create a REST Web Service to process our application logic.
- Create a complete Facebook application (Game).
- Install and set up integration tests using Arquillian.
- Setup a MySQL DB on the OpenShift platform to help store your data more permanently.
- Use the Twitter API to allow you to send direct SMS messages to users for free. (*possible future article)
Install Java (JDK 6+)
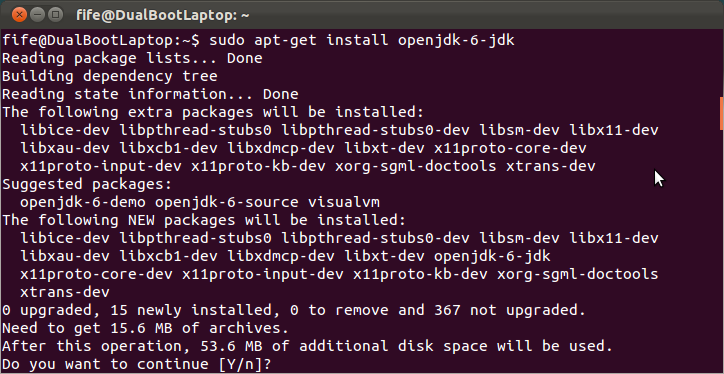
We need to make sure we have a Java 6 (or higher) Java Development Kit (JDK) installed. If you don’t have a JDK, and you’re on Windows (or want to do it manually on UNIX), you can download it and follow the instructions straight from Sun/Oracle here. Alternatively, if you are on Ubuntu you may use an open-source bash script to perform a streamlined installation; the script even allows you to select the version of Java you wish to install. Installing Java is relatively simple, and should take no more than a few minutes; Ubuntu/Apt linux users can also simply type the following into a terminal, like this.sudo apt-get install openjdk-6-jdk
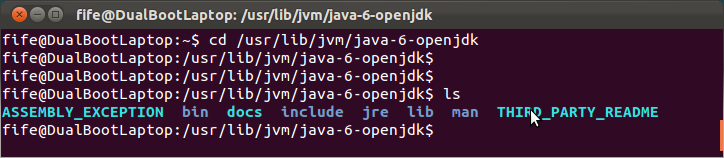
/usr/lib/jvm/java-6-openjdk directory (aka: JAVA_HOME) and make sure that you have both bin/ and lib/ directories. This is where Java is typically installed on Ubuntu distributions.
Install Eclipse and JBoss Tools
Go to the Eclipse for EE developers download page, choose the version appropriate for your operating system, and extract the distribution file into a folder on your hard disk. Then, go to the folder where you extracted the distribution and open Eclipse by double clicking on the executable file (usually just calledeclipse) – you do not need to perform an installation.
Once Eclipse is opened, we need to download JBoss Tools. Click and drag this install button  into your Eclipse window – or open a web browser to this URL and follow the instructions.
It may take several minutes to “Calculate requirements and dependencies” and perform the necessary downloads. After the download is finished, accept the licensing agreement for JBoss Tools in order to complete the installation.
Install JBoss AS 7
While you are free to use whatever server you’d like to locally host your application, JBoss AS7 is currently leaps and bounds ahead of any competitor. Start-up and publish times clock in at UNDER 10 seconds!! Sometimes as fast as 2 seconds. For those that choose to work with Glassfish or (god help you) Websphere, I simply ask, “why submit yourself to all that extra time you’re going to bang your head, screaming at your computer to deploy your app when you could have been coding?” For those of you forced to use any of AS7 competitors by your employers, you have my condolences, and from 9-5 everyday my empathy.- First, download AS7.
You likely want the “Web Profile Only (Java EE6 Certified)” version, and not the “Everything (NOT Java EE6 Certified)”. The Web Profile is a smaller download, and should contain everything you’d need to create your web app. You can consult the AS7 User guides to find more about the exact differences and what the “Everything” AS7 includes that the “Web Profile Only” does not, but you really should be fine with the web profile.
- Go to the path that you downloaded the tar.gz (or zip) file and extract it to an appropriate location (I’ve used ~/projectWork/).
- Open a Terminal and cd into the
bin/directory and execute standalone.sh. Now we can verify that AS7 was fully installed by making sure we get to the welcome screen when going to: http://localhost:8080. If you do not see the AS7 welcome screen, check the server output to make sure there were no problems while starting up.
You can find more information on setting up your JBoss AS 7 server in the JBoss Getting Started Guide.
Install JBoss Forge
If you installed JBoss Tools that comes with Forge already, you can skip this section and access Forge by opening Eclipse and pressing “Ctrl + 4”. This will open a Forge console where you can execute commands directly in Eclipse itself. To ensure you have the most recent version of Forge installed, and/or to execute the lines from a system terminal (as seen later in this tutorial), you can follow the rest of this section, below.- Install Forge by downloading the latest distribution zip-file from here (You’ll probably want the latest release or snapshot).
- Extract it to a directory of your choosing (here I use
/home/fife/projectWork/forge, I will refer to this as my${FORGE_HOME}directory from now on. - Set
FORGE_HOME(and if not already there, JAVA_HOME). For Linux users, update the ~/.profile file. - Add
${FORGE_HOME}/binandJAVA_HOMEto ourPATHenvironment variable.
~/.profile), then add the following to the end of the file:
export FORGE_HOME=~/path_to_forge_folder/
export JAVA_HOME=/usr/lib/jvm/java-6-openjdk
export PATH=$FORGE_HOME/bin:$JAVA_HOME/bin:$PATH
Remember to replace
~/path_to_forge_folder/ with the actual location where you unzipped Forge, otherwise referred to as your FORGE_HOME, then save and quit from the editor. Our result should look something like this.$ forge for the first time, and we are ready to begin developing our Facebook application!
Create your new Facebook app
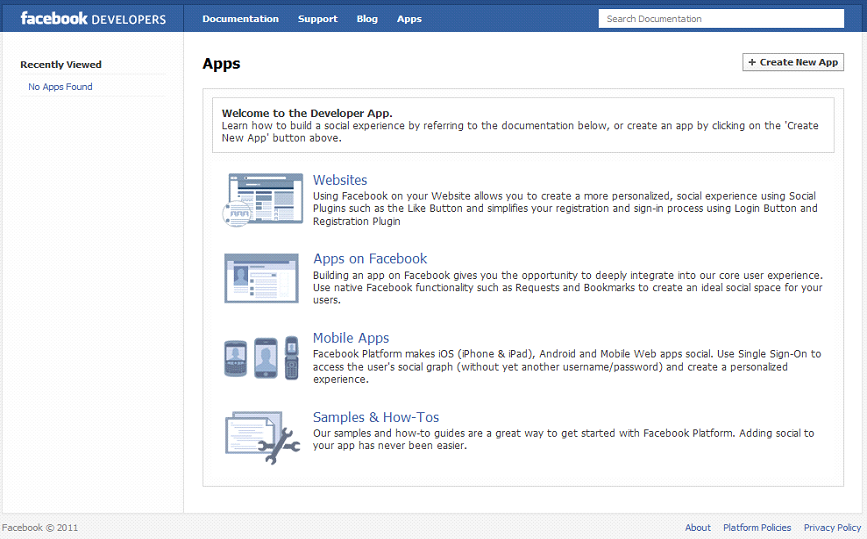
If you are unfamiliar with how Facebook applications work, this Facebook developer article provides a good overview of how Facebook apps work and connect to both Facebook, and your systems. Once you’ve familiarized yourself with the basics, lets go ahead and sign up for a Facebook developer account.- Start by going to the app signup page, but before you click the
Create New Appbutton, make sure that you are a “Verified Facebook User” (This means you have already set up a mobile phone, or credit card with Facebook). If you have not, you will get an error when trying to create a new app. - If this is the first app you are creating with Facebook, you will need to grant permissions for your applications. Make sure that you click
allow. - Now give your new app a name, agree to the terms, fill out the Captcha, and click submit.
Once you click the link to grant permissions, Facebook will give you an access token. Copy and paste that access token to a text editor, as we’ll need to use it later.
Conclusion
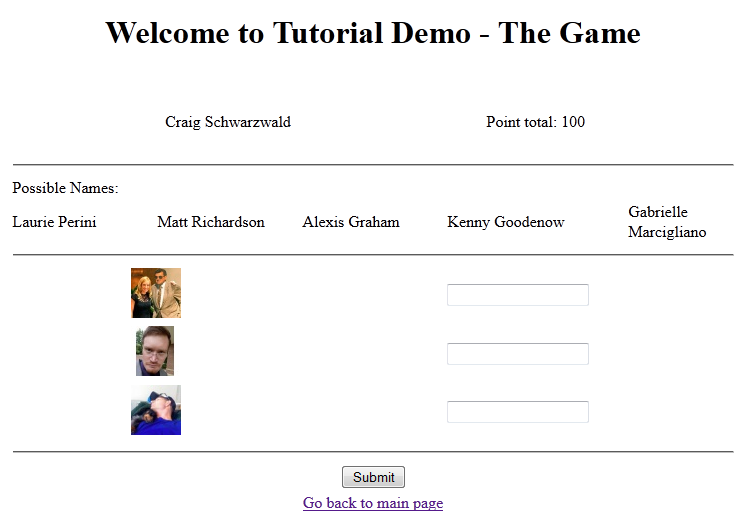
Congratulations! You now have a Facebook App, and your screen should look something like this, and we are almost ready to create our actual application. In the next article we’ll utilize JBoss Forge to help give us a jump start to creating our application with just a few commands, then walk you through signing up for an OpenShift account which will host our new application on the cloud for free.Posted in Facebook, OpenSource

[…] first article in our series took care of setting up and installing an IDE, some tools, and signing up for your […]
Your first JBoss link is down. Do you think its faster than just straight Tomcat? I know its not apples to apples…
Thank you. I’ve updated the link.
Regarding AS7 vs. Tomcat – This is certainly an interesting question. If you are talking about start time, then Tomcat will probably beat AS7 by about 1/2 of a second or so; however, if you are talking about runtime, then that is highly application dependant.
JBoss AS7 uses Tomcat internally, so running applications should be just about as fast. The major differences is that you will have proper classloader isolation in JBoss AS7 (meaning you won’t get random errors because tomcat uses the same class you do)
Aditionally, JBoss AS7 provides the full implementation of the Java EE specification (a-la-carte,) while Tomcat provides only the Servlet specifications. This means that you won’t have built in support for CDI, data-sources (JPA), JAX-RS (REST) and other specifications that “just work” in jboss as7. You would need to configure all of this yourself in Tomcat, which may actually slow your application down or cause errors in production if you don’t have things set up right.
What you get with AS7 is a pre-integrated set of tools, which will only be active if your application needs them. Nothing lost there. It’s a guarantee that hundreds of other open-source developers have done this integration for you, so you don’t need to do it yourself.
You can also buy support for AS7 (i think not yet, but soon?) if you want it, but like tomcat, it’s open-source and free like the wind.
I’ve been following your article, but it appears that once you publish an application, you cannot change the URL. Facebook will only accept apps if they’ve been published to the URL that was initially created. How on Facebook, can I edit my app or create a new one to specify my OpenShift url?
You should be able to go to the Facebook app edit page. There will be an Edit App button next to Create new App in the upper right. Once you Edit the App, the section in the middle of the page “App on Facebook” has Canvas URL, Secure Canvas URL, and Canvas Page. The last one is the Facebook URL which you wont be able to change, it’s simply http://apps.facebook.com/yourAppName. The two Canvas URLs should be editable and you can point them to your OpenShift URL (make sure you simply use https:\\ for the Secure Canvas URL). Facebook will call out to the Canvas URL whenever someone accesses your Canvas Page for content and functionality. Let me know if you still have any questions.
Thanks for following the articles.
[…] Creating a Facebook App with Java […]
Ubuntu repositories do not have sun-java6-jdk package anymore due to security and licensing issues. You will need to install openjdk using the following command:
apt-get install openjdk-6-jdk
Thanks a lot for catching this, you are correct. Obviously those first few steps were from documentation I put together a few months ago. I’ve updated the article with the new command, images, and replaced all other references of the old ‘sun’ directory.
Thanks again.
That was fast. Thanks for writing the article. Good discussion as well.
Hi, nice article.
Could i have a desktop java application integrated with facebook?
thank you for some information
while I’m far less familiar with connecting Facebook to a desktop java application, it should be possible to do. I remember seeing a Native/Desktop option under the Authentication section in the Advanced Facebook App Settings (it’s set to Web by default). There are 2 Java Facebook APIs that I’ve used or read about, but unfortunately neither is officially supported/maintained by Facebook. There’s a Google Code Project – facebook-java-api which I’ve used with some success personally, but it doesn’t seem to get maintained/updated all that well from when I remember using it about a year ago. Questions went unanswered, and the API didn’t appear to be up to date with certain changes Facebook had made back then (maybe its better now). They do however, have a HowTo on authenticating via a desktop app. The other Java API which I’ve only read about, but heard good things is restfb. It’s unfortunate Facebook doesn’t supply their own official Java API, but reading up on those should probably get you where you need to go.
Let me know if you have any other questions. Thanks.
[…] Creating a Facebook App with Java – Part 1 – Setup and Tool Installation […]
[…] this what your looking for? Develop a Facebook application with Eclipse Galileo Creating a Facebook App with Java – Part 1 – Setup and Tool Installation | OCPsoft Reply With […]
can’t i use tomcat server instead of JBoss.
I’m very interesting in implementing this project but I’d like to be assured that all of the JBoss tools are still functional and available as listed here. If anyone else is working on this at this late date 2 years later and having success with expanding on it I’d love to hear from you.
I’m very pleased to uncover this great site. I need to to thank
you for your time for this fantastic read!! I definitely loved every little bit of it and i also have you book-marked to look
at new information on your web site.