 April 18th, 2012 by
  Craig Schwarzwald
 Creating a Facebook App with Java – Part 4 – Integration Testing With Arquillian
Close your eyes, take a deep breath, then repeat after me: “Trying to test any Enterprise application by manually executing a test suite is just preposterous, and an application with any complexity at all quickly becomes too burdensome to test without automation.”
Now repeat it a hundred times – still think you can live without automation?
In part one we set up our tools, part two we did project configuration, and in part three we ended with a fully functional application; however, now that you’ve become familiar with the Red Hat tools and Facebook API, it’s time we get to a topic we ideally should have started with in the first place: TESTING!

Congratulations!!! You’ve just created and run your first automated Arquillian test.
In this next test we use
Now download the jar file, and add it to your project classpath by going to
The code above should be understandable as is, since we are simply creating 2 methods which execute our GET request and POST requests, respectively. This is straightforward template code that you can find anywhere on the internet for performing GET and POST calls from Java. The HTTPResponse from each request is returned as a string and then converted to it’s proper Java object through Gson so we can examine it in our test.
There are a few more helper functions that utilize each of the doGET and doPOST methods to perform specific actions that will be called over and over in our tests. These methods are separated into a different class to keep the
It’s time to refresh and build our project to make sure all our changes are picked up.
If our updates were successful, we can now use the any of the data we’ve added in the
In theory, we’ve just tested boundary conditions of zero friends and four friends, and the code should look nearly identical to the test of the GET and POST requests. The WebService is simply expecting a single
Another build in Forge, and another BUILD SUCCESSFUL!!! Now you’re really getting the hang of it!
The next test is for a successful generation of a valid game link for a user with five or more friends.
Most of this test is nearly identical to the last, but I’ve added a few helper methods to allow us to do something that goes a step further. As opposed to our check in the last test, which was for our alert to match a static
The helper methods should be easy enough to understand. From the bottom up:
With another
Notice how I put a couple of
And if we scroll all the way up in log, we should see the source of this failure. The WebService doesn’t know how to process this POST request because it can’t match something that looks like
Simply update the
We update the
Finished at last! We’ll run the build one more time, and make sure to refresh our project and fully clean the IDE just to make sure all our changes are going to be picked up. If it doesn’t work, try restarting your local server, and republish your application, just make sure to stop the local server again before you kick off the Arquillian tests.
Congratulations! You now not only have a fully functional app, but one that’s fully covered through Automated Integration Tests. You should have no problems adding more functionality now, you’ll know right away if anything happens to break from future changes!
First install the openshift command line tools:
Now go to your app on Facebook and submit a group of answers that will change your point total. Now from a system prompt, run the following commands to stop and then restart the app server again. Go back to your app and notice your points are reset.
Since our experiment has confirmed that our database is being deleted every time the server restarts, lets now install MySQL and then we’ll change our persistence settings so data persists even if we upload future changes, or stop the server for any reason.
Now we need to update standalone.xml for the MySQL Datasourse. set the enable flag to true, update the connectionURL, username, and password.
Then we update our persistence.xml file to set the jta-data-source to java:jboss/datasources/MysqlDS and remove the “
Lastly, we can install PHPMyAdmin for some finer control of our MySQL DB from a graphical interface on the web.
Lets go back into forge and do one last deploy
Then we can go to: https://fbtutorialdemo-schwarzwaldomain.rhcloud.com/phpmyadmin/ and retype the user and password OpenShift just gave us for a web UI view of our database!
If you go to the FBTutorialDemo(AppName) database, we can see our tables, and if you access the facebook app to POST yourself as a User and Player (and all your friends as Users). You can then go back to the phpmyadmin page and into a table like
Please follow me on twitter @CavemanCraig for more alerts as I publish future articles or have other OCPsoft updates. Thanks for reading this article series, and good luck on creating the next Farmville!
If you’re just joining us now and want a quick way to catch up, you can download the starter project we created through in the first 3 articles of this series: v1.0.zip — Create the Game.
Attributes of ideal tests
There are several attributes that an automated test should have, and if any one of these are missing, your test suite could quickly become more burdensome to execute, and more costly to maintain.-
Tests should live within the code.
Automating tests with tools like Hewlet Packard’s “QuickTest Pro,” or “Selenium IDE” is literally a waste of time. If your “automated” test suite doesn’t live in the code, and can’t be run via an un-manned continuous integration server, then your “automated” test suite is practically useless; you’re wasting time, money, and worst of all: developer motivation. Tests in the code provides us with two key factors:- The automatic version control of our tests with our code. We can run the test suite for any version of our project, and that test suite should successfully test that version of the code.
- Tests in the project code (
src/test/java) enable us to easily perform the tests on everybuild, and/or with a simplemvn testcommand.
-
Tests need to be fast!
Entire suites of hundreds or thousands of tests should be able to execute within a few minutes or less. -
Tests should not rely on mocks!
“Don’t mock me!” Tests should use actual resources, not rely on Mocks that represent perfect best case scenarios for inputs (and in worst case, are laden with bugs themselves). We want to be able to commit data, retrieve that data, modify the data, take actions, and validate logic all within the same end-to-end test. -
Tests should be query and assert against your application’s APIs.
If you use CDI or a dependency injection container, your tests should be able to inject bean instances so we can inspect and validate any of our service or model values at any point in any test.
Enter Arquillian
Arquillian is an Integration Test Framework developed by JBoss. It enables real testing of Java applications “in-container,” granting access to all server-side resources running on an actual environment like the one in which your application will be deployed. We can query the database in our test, inject services into our test, change data values in our test, and best of all, Arquillian makes all of this possible simply by extending your Junit (or TestNG) unit tests; your test suite can run with every build, against any environment.Arquillian is an integration testing framework, and should be used to supplement (not replace) your unit test suite. Proper unit testing is essential to maintain the ability to refactor internal code and services, and should not be omitted in favor of pure integration testing.
Setup Arquillian in our project
If you’d like to follow the official Arquillian guides, feel free to learn and go through them at your own pace. Or you can follow the instructions below for a more tailored example and explanation. The first thing we will do is re-open our project in Forge, then we will install the Forge-Arquillian plugin that will greatly simplify all of our configuration and setup work. Use the following commands to return to your project (replace “my_facebook_project” with the path to your actual project,) and install the Forge-Arquillian plugin.forge> cd my_facebook_project forge> forge install-plugin arquillian
/home/username/.forge/plugins/org/arquillian/forge/arquillian-plugin/
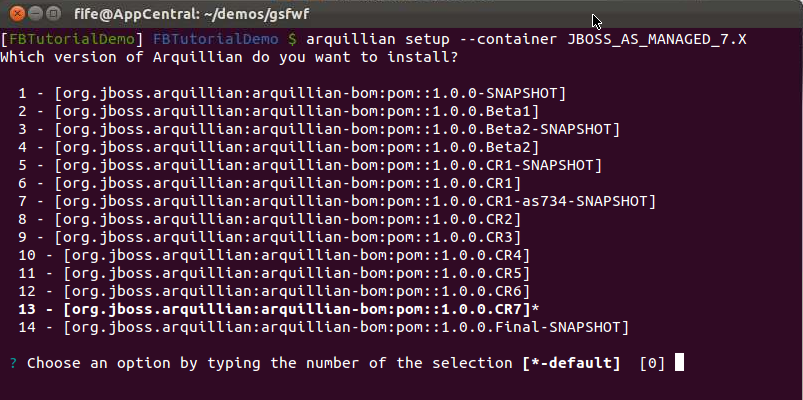
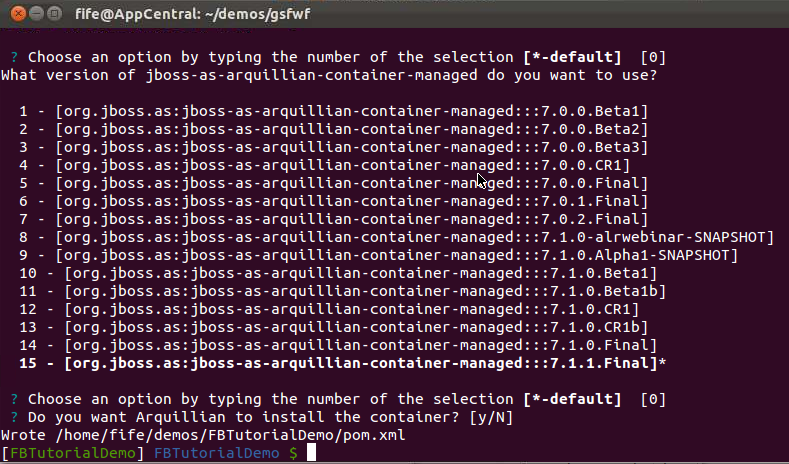
Now it’s time to install an Arquillian container, and while you may use any of the containers in the plugin (just hit <TAB> to see your options), I continue to suggest using JBoss AS 7. The following command will take care of this configuration for us:
forge> arquillian setup --container JBOSS_AS_MANAGED_7.X
<Enter> to select all the defaults for Arquillian version, JUnit version, and Container version. This will ensure that you have a working Arquillian installation configured for JBoss AS 7 and JUnit.
Create a sample test
Now that we have Arquillian installed and set up (that was easy!), it’s time to create our first Arquillian test; we again turn to Forge for help. We’re going to start out by creating a test class for Player in which we’ll end up testing some basic functionality around storing and retrieving players.forge> arquillian create-test --class com.example.domain.Player.java --enableJPA
/src/test/java/PlayerTest.javaView complete file
@RunWith(Arquillian.class)
public class PlayerTest {
    @Inject private MyWebService myWebService;

    @Deployment public static WebArchive createDeployment() {
        return ShrinkWrap.create(WebArchive.class, "test.war")
                .addClasses(MyWebService.class)
                .addClasses(User.class)
                .addClasses(Player.class)
                .addClasses(Link.class)
                 .addAsResource("META-INF/persistence.xml")
                 .addAsWebInfResource(EmptyAsset.INSTANCE, "beans.xml");
    }

    @Test
    public void testIsDeployed() {
        Assert.assertNotNull(myWebService);
    }

}@RunWith(Arquillian.class) and @Deployment attributes are required by the Arquillian framework.
Within our Deployment, we tell Arquillian what classes and resources we want to load into our test container so we can have access to them for each of our tests. Notice that we’ve added not just the class under test Player, but also MyWebService, User, and Link, which are all used within MyWebService the thing we want to inject. Failing to add all these classes to the Deployment will cause test failures.
Lastly, we use standard JUnit @Test methods to perform our assertions; our first test confirms that Arquillian has been set up correctly, and that we have access to injectable services from our application within the test itself.
Confirm that our setup and test creation worked correctly by running the following command. Remember that if the mywebservice reference isn’t null in our test, then we have proved Arquillian is correctly giving us access to our resources. Make sure to use the profile of the container we added earlier (if you are uncertain which container you configured, check your pom.xml file.) For the JBoss AS7 container you may type:
forge> build --profile JBOSS_AS_MANAGED_7.X
If you have trouble running this command from the Forge Console in Eclipse, a native Forge terminal may provide better success.
Tests run: 1, Failures: 0, Errors: 0, Skipped: 0 ... BUILD SUCCESSFUL |
Get caught up
If you had any trouble following along, simply grab the code to this point from github tag: v1.1.zip — Install Arquillian and Sample Test .Arquillian In-Container Example
Now we know we have access to those injected services, lets test a few of them out. Add the following code just below the@Test currently in our test class:
/src/test/java/PlayerTest.javaView complete file
@Test
public void testPlayerInContainer() {
	ArrayList<String> friendIDList = new ArrayList<String>();
	friendIDList.add("newArray");
	friendIDList.add("67890");
	friendIDList.add("newArray");
	friendIDList.add("One Friend");
	Player player = myWebService.playerPOSTRequest(999, "Ima Player", friendIDList);
	User user = myWebService.getUser(67890);

	//Asserts after POST
	Assert.assertTrue(player.getFriendList().size()==1);
	Assert.assertTrue(player.getPlayerInfo().getName().equals("Ima Player"));
	Assert.assertTrue(user.getImageURL().equals(myWebService.resolveURL(67890)));

	long points = myWebService.getPlayerPoints(999);

	//Assert after GET
	Assert.assertTrue(points==100);

	//Remove the Player and make sure it happened
	String result = myWebService.playerRemovalRequest(999);
	Assert.assertTrue(result.equals("Player removed with FacbookID: 999"));
}playerPOSTRequest to post a new player with 1 friend, which means we are also creating One Friend as a User and then adding him to the friendList. We test a few of these things with Assertions, and then perform a GET on points, and then a playerRemovalRequest and Assert those as well.
Now when we do another build --profile JBOSS_AS_MANAGED_7.X in Forge we see we’ve successfully tested that our internal workings of our web service (specifically several services around Players) are all working correctly!
This is great! We can see how to create automated test cases where we can inject our databeans and assert the value of various attributes even in the middle of a use case flow! In our case however, you may be wondering, “But what about ensuring the WebService calls through http GET and POST requests like a real user would be doing?” This is a fair point since the above test basically bypasses the fact we have a WebService with endpoints by simply calling the desired method directly.
Arquillian allows for 2 ways to run your tests; in-container mode (the default) which you’ve now seen, and client mode which lets you test outside the container just like an actual user. Lets set up another Test Class for MyWebServiceTest.java where we’ll put all our other tests, and we’ll setup this entire class to run in client mode so we can test the actual GET and POST calls just like a client would.
Get caught up
If you had any trouble following along, simply grab the code to this point from github tag: v1.2.zip — Arquillian In-Container Example .Create setup() and tearDown() methods
Now it’s time to set up some data for our tests. It is worth noting that there is never any guarentee as to which@Test method will run before any other, no matter where you put them in your class. The only methods with guarenteed order are annotated @Before and @After test execution. These methods run before each test is run, and after each test is run, respectively. We can use this to set up a bunch of data that we can use in all our tests, ensuring that it is reset for each @Test method.
We can do this by creating some useful GET and POST methods in a Util class that can reference our WebService. Showcasing the true power of Arquillian, we are GETing and POSTing true database objects! You’ll see absolutely no mocking in any of these tests!!!
The next step is to set up Gson (Google’s JSON / Java library) in our project so we can convert JSON responses from our web-service back into actual Java classes, effectively creating a simple REST client inside our test case. We can do this by simply adding the dependency to our pom, and the gson-2.1.jar file to our project classpath.
Add GSON to our pom.xml
<project>
  ...
  <dependencies>
    ...
    <dependency>
      <groupId>org.jboss.arquillian.junit</groupId>
      <artifactId>arquillian-junit-container</artifactId>
      <scope>test</scope>
    </dependency>
    <!-- Insert GSON dependency here -->
    <dependency>
      <groupId>com.google.code.gson</groupId>
      <artifactId>gson</artifactId>
      <version>2.1</version>
      <scope>test</scope>
    </dependency>
  </dependencies>
  ...
</project>Project-> Properties-> Java Build Path -> Libraries tab and click on Add
External Jars… and navigate to where you extracted gson-2.1.jar.
We’re now ready to create src/test/java/TestUtils, the utility class where we will set up a number of useful GET and POST calls we can reference from our test classes:
src/test/java/TestUtils.javaView complete file
package com.example.domain;

import java.io.BufferedReader;
import java.io.IOException;
import java.io.InputStreamReader;
import java.io.OutputStreamWriter;
import java.net.HttpURLConnection;
import java.net.MalformedURLException;
import java.net.URL;
import java.util.ArrayList;

import com.google.gson.Gson;

public class TestUtils {

	public static String doGET(String URLstring) {
		try {
			String returnVal = "";

			URL url = new URL(URLstring);
			HttpURLConnection conn = (HttpURLConnection) url.openConnection();
			conn.setRequestMethod("GET");
			conn.setRequestProperty("Accept", "application/json");

			if (conn.getResponseCode() != 200) {
				returnVal = "Failed : HTTP error code : "
						+ conn.getResponseCode();
			}

			BufferedReader br = new BufferedReader(new InputStreamReader(
					(conn.getInputStream())));

			String output;
			while ((output = br.readLine()) != null) {
				returnVal += output;
			}

			conn.disconnect();
			return returnVal;

		} catch (MalformedURLException e) {
			e.printStackTrace();
			return null;
		} catch (IOException e) {
			e.printStackTrace();
			return null;
		}
	}

	public static String doPOST(String URLstring, String JSONInput) {
		try {
			String returnVal = "";

			URL url = new URL(URLstring);
			HttpURLConnection conn = (HttpURLConnection) url.openConnection();
			conn.setDoOutput(true);
			conn.setRequestMethod("POST");
			conn.setRequestProperty("Content-Type", "application/json");

			OutputStreamWriter wr = new OutputStreamWriter(
					conn.getOutputStream());
			wr.write(JSONInput);
			wr.flush();

			// Get the response
			BufferedReader rd = new BufferedReader(new InputStreamReader(
					conn.getInputStream()));
			String line;
			while ((line = rd.readLine()) != null) {
				returnVal += line;
			}
			wr.close();
			rd.close();
			return returnVal;

		} catch (MalformedURLException e) {
			e.printStackTrace();
			return "printStackTrace error: " + e;
		} catch (IOException e) {
			e.printStackTrace();
			return "IOException error: " + e;
		}
	}

	public static Player createPlayerWithFriends(URL baseContext,
			long facebookID, String name, ArrayList<String> friendIDList) {
		String targetURL = baseContext + "rest/webService/UserRequest/"
				+ facebookID + "/" + name;
		String JSONInput = "";
		String response = doPOST(targetURL, JSONInput);

		targetURL = baseContext + "rest/webService/PlayerRequest/" + facebookID
				+ "/" + name;
		JSONInput = friendIDList.toString();
		response = doPOST(targetURL, JSONInput);

		targetURL = baseContext + "rest/webService/Player/" + facebookID;
		response = doGET(targetURL);

		Gson gsonPlayer = new Gson();
		Player responsePlayer = gsonPlayer.fromJson(response, Player.class);

		return responsePlayer;
	}

	public static User getUser(URL baseContext, long facebookID) {
		String targetURL = baseContext + "rest/webService/User/" + facebookID;
		String response = doGET(targetURL);

		Gson gsonUser = new Gson();
		User responseUser = gsonUser.fromJson(response, User.class);

		return responseUser;
	}

	public static Player getPlayer(URL baseContext, long facebookID) {
		String targetURL = baseContext + "rest/webService/Player/" + facebookID;
		String response = doGET(targetURL);

		Gson gsonPlayer = new Gson();
		Player responsePlayer = gsonPlayer.fromJson(response, Player.class);

		return responsePlayer;
	}

	public static String removePlayer(URL baseContext, long facebookID) {
		String targetURL = baseContext
				+ "rest/webService/PlayerRemovalRequest/" + facebookID;
		String JSONInput = "";
		String response = doPOST(targetURL, JSONInput);

		return response;
	}
}MyWebServiceTest class as relatively short and clean as possible (since it’s going to house basically all our tests in this demo), and to share functionality with other test classes in the future.
Now that we have all the setup and Util methods done, lets create our setup() and tearDown() methods and a @Test to make sure it’s working.
/src/test/java/MyWebServiceTest.javaView complete file
package com.example.domain;

import java.net.URL;
import java.util.ArrayList;

import org.jboss.arquillian.container.test.api.Deployment;
import org.jboss.arquillian.junit.Arquillian;
import org.jboss.arquillian.test.api.ArquillianResource;
import org.jboss.shrinkwrap.api.ShrinkWrap;
import org.jboss.shrinkwrap.api.asset.EmptyAsset;
import org.jboss.shrinkwrap.api.spec.WebArchive;
import org.junit.After;
import org.junit.Assert;
import org.junit.Before;
import org.junit.Test;
import org.junit.runner.RunWith;

@RunWith(Arquillian.class)
public class MyWebServiceTest {

	@Deployment(testable = false)
	// testable = false to run as a client
	public static WebArchive createDeployment() {
		return ShrinkWrap.create(WebArchive.class, "FBTutorialDemo.war")
				.addClasses(MyWebService.class).addClasses(User.class)
				.addClasses(Player.class).addClasses(Link.class)
				.addAsResource("META-INF/persistence.xml")
				.addAsWebInfResource(EmptyAsset.INSTANCE, "beans.xml");
	}

	@ArquillianResource
	private URL baseContext; // http://localhost:8080/FBTutorialDemo/

	@Before
	public void setup() throws Exception {
		// Put all the sample data into our database

		ArrayList<String> friendIDList = new ArrayList<String>();
		friendIDList.add("\"newArray\"");
		friendIDList.add("\"newArray\"");
		TestUtils.createPlayerWithFriends(baseContext, 1000,
				"Ihave%20ZeroFriends", friendIDList);

		friendIDList.clear();
		friendIDList.add("\"newArray\"");
		friendIDList.add("\"67890\"");
		friendIDList.add("\"newArray\"");
		friendIDList.add("\"One Friend\"");
		TestUtils.createPlayerWithFriends(baseContext, 1001,
				"Ihave%20OneFriends", friendIDList);

		friendIDList.clear();
		friendIDList.add("\"newArray\"");
		friendIDList.add("\"67890\"");
		friendIDList.add("\"76543\"");
		friendIDList.add("\"89012\"");
		friendIDList.add("\"21098\"");
		friendIDList.add("\"newArray\"");
		friendIDList.add("\"One Friend\"");
		friendIDList.add("\"Two Friend\"");
		friendIDList.add("\"Three Friend\"");
		friendIDList.add("\"Four Friend\"");
		TestUtils.createPlayerWithFriends(baseContext, 1004,
				"Ihave%20FourFriends", friendIDList);

		friendIDList.clear();
		friendIDList.add("\"newArray\"");
		friendIDList.add("\"67890\"");
		friendIDList.add("\"76543\"");
		friendIDList.add("\"89012\"");
		friendIDList.add("\"21098\"");
		friendIDList.add("\"91234\"");
		friendIDList.add("\"newArray\"");
		friendIDList.add("\"One Friend\"");
		friendIDList.add("\"Two Friend\"");
		friendIDList.add("\"Three Friend\"");
		friendIDList.add("\"Four Friend\"");
		friendIDList.add("\"Five Friend\"");
		TestUtils.createPlayerWithFriends(baseContext, 1005,
				"Ihave%20FiveFriends", friendIDList);

		friendIDList.clear();
		friendIDList.add("\"newArray\"");
		friendIDList.add("\"67890\"");
		friendIDList.add("\"76543\"");
		friendIDList.add("\"89012\"");
		friendIDList.add("\"21098\"");
		friendIDList.add("\"91234\"");
		friendIDList.add("\"77441\"");
		friendIDList.add("\"88552\"");
		friendIDList.add("\"99663\"");
		friendIDList.add("\"11223\"");
		friendIDList.add("\"44556\"");
		friendIDList.add("\"newArray\"");
		friendIDList.add("\"One Friend\"");
		friendIDList.add("\"Two Friend\"");
		friendIDList.add("\"Three Friend\"");
		friendIDList.add("\"Four Friend\"");
		friendIDList.add("\"Five Friend\"");
		friendIDList.add("\"Six Friend\"");
		friendIDList.add("\"Seven Friend\"");
		friendIDList.add("\"Eight Friend\"");
		friendIDList.add("\"Nine Friend\"");
		friendIDList.add("\"Ten Friend\"");
		TestUtils.createPlayerWithFriends(baseContext, 1010,
				"Ihave%20TenFriends", friendIDList);
	}

	@After
	public void tearDown() throws Exception {
		// Clear all the sample data out of our database now that we're done
		// running all the tests.

		String response = TestUtils.removePlayer(baseContext, 1000);
		Assert.assertTrue(response
				.equals("Player removed with FacbookID: 1000"));
		response = TestUtils.removePlayer(baseContext, 1001);
		Assert.assertTrue(response
				.equals("Player removed with FacbookID: 1001"));
		response = TestUtils.removePlayer(baseContext, 1004);
		Assert.assertTrue(response
				.equals("Player removed with FacbookID: 1004"));
		response = TestUtils.removePlayer(baseContext, 1005);
		Assert.assertTrue(response
				.equals("Player removed with FacbookID: 1005"));
		response = TestUtils.removePlayer(baseContext, 1010);
		Assert.assertTrue(response
				.equals("Player removed with FacbookID: 1010"));

		System.out.println("\n\n\n\n\n\n\n\nbaseContext: " + baseContext);
	}

	@Test
	public void testSetupData() {
		// Retrieve the sample data from our database and make sure it's what we
		// expect

		Player playerWith0Friends = TestUtils.getPlayer(baseContext, 1000);
		Player playerWith1Friends = TestUtils.getPlayer(baseContext, 1001);
		Player playerWith4Friends = TestUtils.getPlayer(baseContext, 1004);
		Player playerWith5Friends = TestUtils.getPlayer(baseContext, 1005);
		Player playerWith10Friends = TestUtils.getPlayer(baseContext, 1010);

		Assert.assertTrue(playerWith0Friends.getFriendList().size() == 0);
		Assert.assertTrue(playerWith1Friends.getFriendList().size() == 1);
		Assert.assertTrue(playerWith4Friends.getFriendList().size() == 4);
		Assert.assertTrue(playerWith5Friends.getFriendList().size() == 5);
		Assert.assertTrue(playerWith10Friends.getFriendList().size() == 10);

		Assert.assertTrue(playerWith10Friends.getFriendList().get(0) == 67890);
		User twoFriend = TestUtils.getUser(baseContext, playerWith5Friends
				.getFriendList().get(1));
		Assert.assertTrue(twoFriend.getName().equals("Two Friend"));
	}

}forge> build --profile JBOSS_AS_MANAGED_7.X
setup() method in any of our @Test methods.
Get caught up
If you had any trouble following along, simply grab the code to this point from github tag: v1.3.zip — Create setup() and tearDown() for Arquillian tests.Create tests for our business logic
Now that we know that our database and WebService is working well in our Arquillian tests, it’s time to implement a couple of@Test methods that will ensure our application works as expected.
We’ll start by ensuring our GameLink is generated correctly for players who have fewer than five friends. Remember, according to our design, four or fewer friends is not enough to play, so the player should be sent back to index.html if they do not meet this requirement.
/src/test/java/MyWebServiceTest.javaView complete file
@Test
public void testGameLinkForNotEnoughFriends() {
    	Player playerWith0Friends = TestUtils.getPlayer(baseContext, 1000);

	//Test that the Player has 0 friends and has the correct link.
	String expectedOnCLickMethod =
		"(function (){alert('You do not have enough friends to play the game.');return false;});";
	Assert.assertTrue(playerWith0Friends.getFriendList().size()==0);
	Assert.assertTrue(playerWith0Friends.getGameLink(). getOnClickMethod().equals(expectedOnCLickMethod));
	Assert.assertTrue(playerWith0Friends.getGameLink(). getHref().equals("index.html"));

	Player playerWith4Friends = TestUtils.getPlayer(baseContext, 1004);

	//Test that the Player with 4 friends also has the correct link.
	Assert.assertTrue(playerWith4Friends.getFriendList().size()==4);
	Assert.assertTrue(playerWith4Friends.getGameLink(). getOnClickMethod().equals(expectedOnCLickMethod));
	Assert.assertTrue(playerWith4Friends.getGameLink() .getHref().equals("index.html"));
}ArrayList as input with two elements of "newArray" to signify the start of friendList and friendName arrays respecively. We can put as many or as few longs and Strings respectively inro our data arrays to add any number of friends to our Player for a given test method execution.
forge> build --profile JBOSS_AS_MANAGED_7.X
/src/test/java/MyWebServiceTest.javaView complete file
@Test
	public void testGameLinkForValidNumOfFriends(){
    		Player playerWith5Friends = TestUtils.getPlayer(baseContext, 1005);

		//Test that the Player has 5 friends and has the correct link.
		String expectedHrefBeginning = "playGame.html?playerID="
				+ playerWith5Friends.getPlayerInfo().getFacebookID() + "&playerName="
				+ playerWith5Friends.getPlayerInfo().getName() + "&playerPoints="
				+ playerWith5Friends.getPoints() + "&friendIDList=";
		Assert.assertTrue(playerWith5Friends.getFriendList().size()==5);
		Assert.assertTrue(playerWith5Friends.getGameLink().getOnClickMethod().equals(""));
		Assert.assertTrue(playerWith5Friends.getGameLink().getHref().startsWith(expectedHrefBeginning));

		//Since the friendIDList and friendNameList passed in the GameLink.Href are random,
		//we can't validate them in any simple manner.  However, we can verify that our
		//requirements are still in working order.  We need to make sure that the names
		//that go with all 3 friendIDList entries are among the 5 friendNameList entries
		Assert.assertTrue(isValidGameLinkLists(expectedHrefBeginning, playerWith5Friends));


		Player playerWith10Friends = TestUtils.getPlayer(baseContext, 1010);
		expectedHrefBeginning = "playGame.html?playerID="
				+ playerWith10Friends.getPlayerInfo().getFacebookID() + "&playerName="
				+ playerWith10Friends.getPlayerInfo().getName() + "&playerPoints="
				+ playerWith10Friends.getPoints() + "&friendIDList=";

		//Test that the Player with 10 friends also has a correct link.
		Assert.assertTrue(playerWith10Friends.getFriendList().size()==10);
		Assert.assertTrue(playerWith10Friends.getGameLink().getOnClickMethod().equals(""));
		Assert.assertTrue(playerWith10Friends.getGameLink().getHref().startsWith(expectedHrefBeginning));
		Assert.assertTrue(isValidGameLinkLists(expectedHrefBeginning, playerWith10Friends));
	}

	private boolean isValidGameLinkLists(String HrefBeginning, Player player){
		//Parse the player's GameLink to get the friendIDList and friendNameList
		int friendIDStart = HrefBeginning.length();
		int friendIDEnd = player.getGameLink().getHref().indexOf("&friendNameList=");
		String friendIDs = player.getGameLink().getHref().substring(friendIDStart, friendIDEnd);
		int friendNameStart = player.getGameLink().getHref().indexOf("friendNameList=") + 15; //we need to add len("friendNameList=")
		String friendNames = player.getGameLink().getHref().substring(friendNameStart);

		ArrayList<String> friendIDList = getListFromString(friendIDs);
		ArrayList<String> friendNamesList = getListFromString(friendNames);
		for (String friendID : friendIDList) {
			//Check that each friendID matches to a name in the friendNameList

			User curUser = TestUtils.getUser(baseContext, Long.valueOf(friendID));
			if(curUser==null){
				System.out.println("No User found in DB for ID: " + friendID);
				return false;
			}
			else {
				if(userNameInList(curUser, friendNamesList) == false){
					System.out.println(curUser.getName() + ", ID [" + friendID +
							"was not  in the friendNamesList");
					return false;
				}
			}

			//Ensure each friendID is a member of the player's friendList
			if(player.getFriendList().contains(Long.valueOf(friendID)) == false){
				System.out.println("ID [" + friendID + "] is not among the players friendlist"
						+ player.getFriendList());
				return false;
			}
		}
		return true;
	}

	public boolean userNameInList(User user, ArrayList<String> friendNamesList){
		String curName = user.getName();
		for (String friendName : friendNamesList) {
			if(curName.equals(friendName)){
				return true;
			}
		}
		return false;
	}

	public ArrayList<String> getListFromString(String text){
		 ArrayList<String> list = new ArrayList<String>();
             //NOTE: Need to add import for StringTokenizer!!!
	     StringTokenizer tokens = new StringTokenizer(text,",");
	     while(tokens.hasMoreTokens()){
	    	 list.add((String) tokens.nextElement());
	     }
	     return list;
}String in the OnClickMethod, here we actually validate that the GameLink we create meets our requirements. Namely we validate that each friendID in the GameLink is actually a friend of the player, and that each friendID matches to one of the friendNames in the same GameLink via a GET request lookup. This test guarantees us that the user will see a game page with valid friend pictures and names at the top of their screens.
Note, we only ensure that each ID has a matching name, not vice-versa. Since there are 3 IDs in the list, and 5 names, the user still has to guess – leaving 2 names out.
getListFromString() simply converts a comma seperated string into an ArrayList. The userNameInList() method checks if the name of a User is within an ArrayList. And in isValidGameLinkLists() we parse the Player’s GameLink to get the friendIDList and friendNameList it contains, then perform a GET request on each friendID and check that it’s both an actual friend of the Player, and that it matches 1 of the 5 friendNames. If any of these checks fail, we return false immediately since there’s no sense in checking the rest of the data.
Get caught up
If you had any trouble following along, simply grab the code to this point from github tag: v1.4.zip — Arquillian tests for business logic.True End-To-End Integration Testing
Now that we know the GameLinks are getting set up correctly for Players, it’s time to set up tests for the final step: We’re going to simulate a person going to our app, playing our game, and submitting answers back to our web service. This starts with two tests that will cover all our if statements. One test submits incorrect answers to our web service, and the other submits entirely correct answers./src/test/java/MyWebServiceTest.javaView complete file
@Test
	public void testSubmitAllWrongAnswers() {
		Player playerWith5Friends = TestUtils.getPlayer(baseContext, 1005);

		// Take note of the player's points before they submit the wrong answers
		long playerPointsOriginal = playerWith5Friends.getPoints();

		// Submit 3 incorrect answers to our WebService as a POST request
		String targetURL = baseContext
				+ "rest/webService/GameAnswers/"
				+ "1005/67890/76543/89012/Four%20Friend/Five%20Friend/One%20Friend";
		String JSONInput = "";
		String response = TestUtils.doPOST(targetURL, JSONInput);

		// Test that we get the correct String back from the incorrect answers
		// and our points were deducted
		String expectedResponse = "First entry was INCORRECT "
				+ "Second entry was INCORRECT " + "Third entry was INCORRECT "
				+ "You will have a total of [" + 30 + "] points deducted.";

		// Re-GET the player now that the score should be updated
		playerWith5Friends = TestUtils.getPlayer(baseContext, 1005);
		Assert.assertTrue(response.equals(expectedResponse));
		Assert.assertTrue(playerWith5Friends.getPoints() == (playerPointsOriginal - 30));
	}

	@Test
	public void testSubmitAllCorrectAnswers() {
		Player playerWith5Friends = TestUtils.getPlayer(baseContext, 1005);

		// Take note of the player's points before they submit the correct
		// answers
		long playerPointsOriginal = playerWith5Friends.getPoints();

		// Submit 3 correct answers to our WebService as a POST request
		String targetURL = baseContext
				+ "rest/webService/GameAnswers/"
				+ "1005/67890/76543/89012/One%20Friend/Two%20Friend/Three%20Friend";
		String JSONInput = "";
		String response = TestUtils.doPOST(targetURL, JSONInput);

		// Test that we get the correct String back from the incorrect answers
		// and our points were deducted
		String expectedResponse = "First entry was correct "
				+ "Second entry was correct " + "Thrid entry was correct "
				+ "You will have a total of [" + 30 + "] points added!";

		// Re-GET the player now that the score should be updated
		playerWith5Friends = TestUtils.getPlayer(baseContext, 1005);
		Assert.assertTrue(response.equals(expectedResponse));
		Assert.assertTrue(playerWith5Friends.getPoints() == (playerPointsOriginal + 30));
}build in Forge, we should see something like:
Tests run: 7, Failures: 0, Errors: 0, Skipped: 0 ... [INFO] BUILD SUCCESS [INFO] ------------------------------------------------------------------------ [INFO] Total time: 16.873s [INFO] Finished at: Tue Apr 10 22:56:13 EDT 2012 [INFO] Final Memory: 16M/340M [INFO] ------------------------------------------------------------------------ |
Get caught up
If you had any trouble following along, simply grab the code to this point from github tag: v1.5.zip — True End-To-End Integration Tests.Boundary conditions and getting errors
Now that we have virtually everything covered in our series of tests, we’re going to create just one more – there’s a boundary condition we haven’t yet considered. What if a Player goes to our game site and decides to click thesubmit button leaving some or all of their answers blank? Arquillian will come to our rescue yet again, and our new test should look nearly identical to our testSubmitAllWrongAnswers() Test, but having replaced the names in the “answer POST” with nothing. Take a look at what I’ve done:
/src/test/java/MyWebServiceTest.javaView complete file
@Test
	public void testSubmitAllBlankAnswers() {
		String appName = "FBTutorialDemo";
		Player playerWith5Friends = TestUtils.getPlayer(baseContext, 1005);

		// Take note of the player's points before they submit the blank answers
		long playerPointsOriginal = playerWith5Friends.getPoints();

		// Submit 3 blank answers to our WebService as a POST request
		String targetURL = baseContext + "rest/webService/GameAnswers/"
				+ "1005/67890/76543/89012///";
		String JSONInput = "";
		String response = TestUtils.doPOST(targetURL, JSONInput);

		// Test that we get the correct String back from the blank answers and
		// our points were deducted
		String expectedResponse = "First entry was INCORRECT "
				+ "Second entry was INCORRECT " + "Third entry was INCORRECT "
				+ "You will have a total of [" + 30 + "] points deducted.";

		System.out.println("\n\n\n\n\n\n response: " + response);
		System.out.println("\n\n\n\n\n\n");

		// Re-GET the player now that the score should be updated
		playerWith5Friends = TestUtils.getPlayer(baseContext, 1005);
		Assert.assertTrue(response.equals(expectedResponse));
		Assert.assertTrue(playerWith5Friends.getPoints() == (playerPointsOriginal - 30));
}System.out.println statements in there so we can see the response that comes back from the answer POST. When we run this build in Forge, we should now see a failure!
Failed tests: testSubmitAllBlankAnswers(com.example.domain.MyWebServiceTest) Tests run: 8, Failures: 1, Errors: 0, Skipped: 0 [INFO] ------------------------------------------------------------------------ [INFO] BUILD FAILURE [INFO] ------------------------------------------------------------------------ [INFO] Total time: 16.539s [INFO] Finished at: Tue Apr 10 23:11:44 EDT 2012 [INFO] Final Memory: 13M/211M [INFO] ------------------------------------------------------------------------ |
rest/webService/GameAnswers/1245/90123/76543/89012/// to any @Path we have defined. The WebService is looking for some value for each {name#}, so if any of them are left blank, we’ll run into this issue. If you haven’t tried it before, you can run this manually on your current app at the facebook URL and see the app blow up! We generate an alert (among other things) telling us that the requested resource is unavailable.
To remedy this, we’ll need to make a change to our actual application. At least now that we have all our scenarios covered with full end-to-end tests, we can make this change, update any tests that require it, and then with 1 simple build command make sure we’re not only back in business with our full functionality, but that we plugged this hole!
We first need to update the MyWebService class to update the postForAnswers() method like this:
/src/main/java/MyWebService.javaView complete file
// Performs validation on answers submitted, and adjust points.
	@POST
	@Path("/GameAnswers/{playerID}/{id1}/{id2}/{id3}")
	@Consumes("application/json")
	public String postForAnswers(@PathParam("playerID") long playerID,
			@PathParam("id1") long id1, @PathParam("id2") long id2,
			@PathParam("id3") long id3, ArrayList<String> JsonInput) {

		Player player = getPlayerByFacebookID(em, playerID);
		User user1 = getUserByFacebookID(em, id1);
		User user2 = getUserByFacebookID(em, id2);
		User user3 = getUserByFacebookID(em, id3);
		String name1 = "";
		String name2 = "";
		String name3 = "";
		if (null == player || null == user1 || null == user2 || null == user3) {
			// This should never happen, but lets exit gracefully if it somehow
			// does.
			return "Sorry, there was an error trying to validate your answers. Please try again.";
		}
		if (JsonInput.size() != 3) {
			// This needs to be the 3 names the Player is guessing
			return "Sorry, we couldn't understand your 3 guesses. Please try again";
		} else {
			name1 = JsonInput.get(0);
			name2 = JsonInput.get(1);
			name3 = JsonInput.get(2);
		}

		boolean correctName1 = user1.getName().equals(name1);
		boolean correctName2 = user2.getName().equals(name2);
		boolean correctName3 = user3.getName().equals(name3);

		String returnString = "";
		long pointChange = 0;
		if (correctName1) {
			returnString += "First entry was correct \n";
			pointChange += 10;
		} else {
			returnString += "First entry was INCORRECT \n";
			pointChange -= 10;
		}
		if (correctName2) {
			returnString += "Second entry was correct \n";
			pointChange += 10;
		} else {
			returnString += "Second entry was INCORRECT \n";
			pointChange -= 10;
		}
		if (correctName3) {
			returnString += "Thrid entry was correct \n";
			pointChange += 10;
		} else {
			returnString += "Third entry was INCORRECT \n";
			pointChange -= 10;
		}

		returnString += "You will have a total of [" + Math.abs(pointChange)
				+ "] points ";
		if (pointChange > 0) {
			returnString += "added!";
		} else {
			returnString += "deducted.";
		}

		player.setPoints(player.getPoints() + pointChange);
		em.persist(player);

		return returnString;
}// postForAnswers@Path and the parameters to the method, and a quick check to make sure JSONInput contains the three name guesses, then assign the three name variables from the JSONInput.
Almost done, we need to update our playGame.html so that we can pass our JSONInput as a string of the three name guesses.
/src/main/webapp/playGame.htmlView complete file
function doPostAnswers(playerID, ID1, ID2, ID3, JSONInput){
        var POSTAnswersURL = "rest/webService/GameAnswers/" + playerID + "/" +
              ID1 + "/" + ID2 + "/" + ID3;
          var myObj = null;
          var xmlhttp = null;
          if (window.XMLHttpRequest) {
             xmlhttp = new XMLHttpRequest();
             if ( typeof xmlhttp.overrideMimeType != 'undefined') {
               xmlhttp.overrideMimeType('application/json');
             }
          } else if (window.ActiveXObject) {
             xmlhttp = new ActiveXObject("Microsoft.XMLHTTP");
          } else {
             alert('Your browser does not support xmlhttprequests. Sorry.');
          }

          xmlhttp.open('POST', POSTAnswersURL, false);
          xmlhttp.setRequestHeader('Content-Type', 'application/json');
          xmlhttp.send(JSONInput);
          alert(xmlhttp.responseText);
          window.location='index.html';

          xmlhttp.onreadystatechange = function() {
                if (xmlhttp.readyState == 4) {
                    if(xmlhttp.status == 200) {
                        //myObj = eval ( '(' + xmlhttp.responseText + ')' );
                        if(isDEBUG){
                            alert("POST Success");
                          }
                        //alert(xmlhttp.responseText);
                        document.getElementById('submitMessage').innerHTML = xmlhttp.responseText;
                    }
                    else {
                        if(isDEBUG){alert("POST Fail - status: " + xmlhttp.status + " - " + xmlhttp.responseText);}
                    }
                } else {
                    // wait for the call to complete
                }
         };
          return null;
      }

   ...

    function submitAnswers(){
        var playerID = getURLParam("playerID");
        var ID1 = document.getElementById('friendID1').innerHTML;
        var ID2 = document.getElementById('friendID2').innerHTML;
        var ID3 = document.getElementById('friendID3').innerHTML;
        var name1 = document.getElementById('inputName1').value;
        var name2 = document.getElementById('inputName2').value;
        var name3 = document.getElementById('inputName3').value;
        var JSONInput = "[\"" + name1 + "\",\"" + name2 + "\",\"" + name3 + "\"]";
        doPostAnswers(playerID, ID1, ID2, ID3, JSONInput);
}doPostAnswers() changing the parameters, URL, and passing JSONInput in the xmlhttp.send and we just go back to our tests and update the three tests that submit answers.
/src/test/java/MyWebServiceTest.javaView complete file
@Test
public void testSubmitAllWrongAnswers() throws IOException{
        ...
	//Submit 3 incorrect answers to our WebService as a POST request
	String targetURL = baseContext + "rest/webService/GameAnswers/" +
	     "1005/67890/76543/89012";
	String JSONInput = "[\"" + "Four Friend" + "\",\"" + "Five Friend" + "\",\"" + "One Friend" + "\"]";
	String response = TestUtils.doPOST(targetURL, JSONInput);
        ...
}

@Test
public void testSubmitAllCorrectAnswers() throws IOException{
        ...
	//Submit 3 correct answers to our WebService as a POST request
	String targetURL = baseContext + "rest/webService/GameAnswers/" +
	     "1005/67890/76543/89012";
	String JSONInput = "[\"" + "One Friend" + "\",\"" + "Two Friend" + "\",\"" + "Three Friend" + "\"]";
	String response = TestUtils.doPOST(targetURL, JSONInput);
        ...
}

 @Test
public void testSubmitAllBlankAnswers() throws IOException {
        ...
	//Submit 3 blank answers to our WebService as a POST request
	String targetURL = baseContext + "rest/webService/GameAnswers/" +
	     "1005/67890/76543/89012";
	String JSONInput = "[\"" + "\",\"" + "\",\"" + "\"]";
	String response = TestUtils.doPOST(targetURL, JSONInput);
        ...
}Tests run: 8, Failures: 0, Errors: 0, Skipped: 0 [INFO] ------------------------------------------------------------------------ [INFO] BUILD SUCCESS [INFO] ------------------------------------------------------------------------ [INFO] Total time: 17.062s [INFO] Finished at: Wed Apr 11 02:39:37 EDT 2012 [INFO] Final Memory: 15M/337M [INFO] ------------------------------------------------------------------------ |
Get caught up
If you had any trouble following along, simply grab the code to this point from github tag: v1.7.zip — Fixing Issues and updating tests .Bonus: Setup a MySQL Database with OpenShift
As sanity check, we will prove that right now, player’s points will still reset on every restart of the app server since we’re still using hibernate only with create-drop.OpenShift supplies us with a few commands that make this setup very easy, so exit out of Forge (as these OpenShift commands are not part of the Forge plugin).
StandardTerminal $ sudo apt-get install rubygems1.8
StandardTerminal $ sudo gem insall rhc
StandardTerminal app$ rhc app stop -a FBTutorialDemo
StandardTerminal app$ rhc app start -a appName
StandardTerminal app$ rhc-ctl-app -a FBTutorialDemo -e add-mysql-5.1
Make sure you take careful note of the info provided in the terminal as we will need this info on future steps
FBTutorialDemo/.openshift/config/standalone.xmlView complete file
<subsystem xmlns="urn:jboss:domain:datasources:1.0">
            <datasources>
                <!-- disable the hibernate datasource so you don't accidently get confused -->
                <datasource jndi-name="java:jboss/datasources/ExampleDS" enabled="false" use-java-context="true" pool-name="H2DS">
                    <connection-url>jdbc:h2:${jboss.server.data.dir}/test;DB_CLOSE_DELAY=-1</connection-url>
                    <driver>h2</driver>
                    <security>
                        <user-name>sa</user-name>
                        <password>sa</password>
                    </security>
                </datasource>
                <!-- enable the mysqul datasource and set up the config stuff for it -->
                <datasource jndi-name="java:jboss/datasources/MysqlDS" enabled="true" use-java-context="true" pool-name="MysqlDS">
                    <connection-url>jdbc:mysql://127.6.202.129:3306/FBTutorialDemo</connection-url>
                    <driver>mysql</driver>
                    <security>
                      <user-name>admin</user-name>
                      <password>ltSWR4claqRZ</password>
                    </security>
                </datasource>
          ...
        </subsystem>
The above is a sample for my app. Make sure you update the connectionURL, and password to your own info.
create-drop” setting so our data will not get blown away at each server startup.
/src/main/resources/META-INF/persistence.xmlView complete file
<persistence-unit name="forge-default" transaction-type="JTA">
    <description>Forge Persistence Unit</description>
    <provider>org.hibernate.ejb.HibernatePersistence</provider>
    <jta-data-source>java:jboss/datasources/MysqlDS</jta-data-source>
    <exclude-unlisted-classes>false</exclude-unlisted-classes>
    <properties>
      <!-- Using "create-drop" will wipe out your data at each app-server restart.
          Set it to "update" to have your data persist even after uploading app changes.
          Or leave it as-is if you always want a fresh database each time you start the app.
      -->
      <property name="hibernate.hbm2ddl.auto" value="update"/>
      <property name="hibernate.show_sql" value="true"/>
      <property name="hibernate.format_sql" value="true"/>
      <property name="hibernate.transaction.flush_before_completion" value="true"/>
    </properties>
</persistence-unit>StandardTerminal app$ rhc-ctl-app -a FBTutorialDemo -e add-phpmyadmin-3.4
forge> git add -A
forge> git commit "Added mySQL DB and phpmyAdmin"
forge> rhc-express deploy
User and hit the Show: button to see all the users now in your mySQL database.
Go back and re-run the test from the beginning of this section, change your points (either through the app, or directly in the phpmyadmin site if you know what you’re doing, then stop and restart the server. Make sure your points have not been reset back to the 100 default, and we should be good to go!
Conclusion
I hope you enjoyed going through this final article in the series as much as I enjoyed writing it. No application should ever be considered complete without a solid testing strategy and implementation. Arquillian provides us everything we need, since we have all our business logic in our Java WebService class. If you’re currently using Selenium integrated in your JUnit tests, you probably want to take a look at Arquillian Grapheen and Arquillian Drone (two extensions to Arquillian) that will combine the power Selenium gives us to go through web UI flows, with the power of injecting real non-mocked resources into your tests. You’ve just gone from absolute Zero to fully functional app that now has full test coverage with automated tests that run on every build, with a MySQL database to provide persistent data even with server restarts. That should be everything you need to get you on your way, and now it’s time to expand on the functionality, and create your own killer Facebook app. Since you’re familiar with all the tools and concepts now, I recommend you take a “Test Driven Development” approach for all your future work. Write an Arquillian test first, then write the code you need to get it to pass. You’ll maintain your high level of code coverage, and end up writing less code overall; you’ll thank yourself every time you ever feel the need to refactor anything!Final Thoughts
When I started trying to create my first Facebook app almost a year and a half ago, I looked around desperately for a good tutorial that would take me all the way from scratch to working API calls. What I ended up finding was one blog after another that would show 1 small thing, and most had little in the way of explanations. The worst part was trying to integrate multiple tutorials that were each written using older and older Facebook APIs and SDKs, almost none of which are compatible with the others. I was determined to write this article series so that others would not have to go through what I did. I have tried my best to provide step-by-step instructions and explanations, from tool setup to functional game; all with consistent methodology, tools, and design to give you the right and proper start in creating your own fully working Facebook application. Creating this article series took a lot more time than I would have expected. There were several weeks I was extremely frustrated trying to figure out what was wrong with my project, only to later find out Facebook had removed a method or two from it’s Javascript API that I was using. Not being able to test locally using the real Facebook data presented challenges and errors that took longer than I care to admit to resolve. Along with the formatting that you saw throughout this article series, this project was a relatively long time in the making for what it was. And while it may have taken me a long time to get the GitHub files versioned and tagged correctly and everything organized in a way I could describe and explain easily, it is my sincere hope that this work has helped you all get your Facebook apps to a “starting point” that originally took me months to get to in mere minutes/hours by using this blog. I hope you enjoyed this article series and found the information provided to be helpful. Please feel encouraged to leave comments of any kind if you found this useful, or think something can be improved.A very HUGE thank you goes out to Lincoln Baxter, III who continually helped me with all the various errors I would run into when trying to create this demo project. He also spent many painstaking hours helping to format these blog entries and add features on this website, to make them as pretty, and as astectically pleasing as possible for all of you. I’d also like to thank the rest of the JBoss employees that were always nice enough to answer any questions I had. Seriously, use the JBoss and other open source forums, the speed and accuracy of the information you get back is truly amazing!
Posted in Facebook, OpenSource

[…] Creating a Facebook App with Java – Part 4 – Integration Testing With Arquillian […]
Green bar!
Craig, thanks for writing this detailed tutorial. I have no doubt it will help people find their way writing well-tested Facebook apps in Java EE. Nice work!
I have a few clarifications. Feel free to add them to the guide or just leave as an addendum in the comments.
* The term “container adapter” is more appropriate than “container” in the sentence “Now it’s time to install an Arquillian container” and subsequent uses. We caused the confusion by mistakenly using the term “container” in the original guides. It was giving people the impression that Arquillian was providing the container, when in fact Arquillian is only connecting to it or controlling its lifecycle. I’ve been gradually trying to correct our terminology.
* It’s true that there is no guarantee as to which @Test method will run before any other in JUnit itself, but Arquillian introduces this feature. You can annotated your TestMethods with @InSequence(n) to run them in a defined order (where n is the position in the sequence).
* Although there’s no need for the change, I’ll note that when adding only one class to a ShrinkWrap archive, you can use the method “addClass” instead of “addClasses”. To add multiple classes, you can include them all as arguments to a single “addClasses” method, as in addClasses(A.class, B.class, C.class, …).
* It’s not necessary to hardcode the database connection information in the standalone.xml configuration for OpenShift. OpenShift sets up environment variables for these connection properties that you can reference in the file. See http://docs.redhat.com/docs/en-US/OpenShift/2.0/html/User_Guide/sect-User_Guide-Using_Environment_Variables.html for instructions.
* You can drastically simplify the HTTP requests in your tests by using the Apache HttpComponents library (http://hc.apache.org/). I used it in one of my Java EE workshops and it worked out great. See http://mojavelinux.github.com/asciidoc-examples/javaeeworkshop.html#_writing_real_cloud_tests_with_arquillian for how I used it in my tests.
Again, great job!
Very nice write up!
An interesting Part 5 would be a full integration test including Facebook. Deploy the App to OpenShift, running the tests using the Facebook Dev Test environment. 🙂
Very valuable article, many thanks!
I would suggest two things:
1)please give some link to forge
2) change:
Tests should not rely on mocks!
to:
Integration and end-to-end tests should not rely on mocks!
Feel free to fork this article on github! (click the github banner) You can make some of these changes yourself! Otherwise, we will update as soon as possible.
[…] Creating a Facebook App with Java – Part 4 – Integration Testing With Arquillian […]
Ei! I have been following your series, great articles!!!
I solved some issues here and there but now I see a problem I don’t know how to solve. I’m sure its a silly/n00bish question but I dont know how to continue.
In the part “Create setup() and tearDown() methods”, when I try to build the test, it fails. And the failure is a bit weird, it seems the REST services aren’t called and it tries to get to some non-existant file… it outputs FileNotFoundException like this:
Any tip?
I’ve been doing a bit of research in my “issue” with the FileNotFoundException. I know its because I get a 404 HTTP code as response in doPost method of TestUtils.java (line 67, conn.getInputStream)
I have tried to use the 80 HTTP port (running jboss as root) but still I get the FileNotFoundException at TestUtils.java line 67.
its fixed!
There was some weird problem in my JBoss config … when launched by JUnit in eclipse or forge it didnt work… I hadn’t access to any content of FBTutorial (no index.html, no REST, etc).
Tbh I don’t know what thing I changed and now its working… I hate this.
Now I have another issue. If I run the tests isolated (PlayerTest and MyWebServiceTest) they work nice. BUT If I try to run them together (ie. forge build –profile… or run whole project as JUnit) then the second one (MyWebServiceTest) doesnt work! It gives weird hibernate errors (USER table not found) and finally it returns and HTTP500 –> JSon syntax exception (it doesnt get the expected object).
Any suggestions? Its a bit annoying having to run the tests separately, one by one!
Ok I found the problem:
When running the JUnit, hibernate creates the tables for both “test.war” (PlayerTest) and “FBTutorialDemo.war” (MyWebServiceTest). Then, runs the tests of “test.war” and after running them, it erases the tables! so when it starts running the tests of “FBTutorialDemo.war” the tables dont exists and persistence dont work.
So I guess I should tell hibernate not erase tables after the tests are performed? Can I tell it to erase the tables after *all tests* are done?
OKey so changing the persistence.xml “create-drop” to “create” did the trick:
Creating a Facebook App with Java – Part 4 – Integration Testing With Arquillian…
Thank you for submitting this cool story – Trackback from JavaPins…